
Woodworking joints come in a variety of configurations that join together two pieces of wood. Some joints involve carving channels into two different wood pieces so that they lock together, while others use fasteners like nails or screws to hold them in place.
Because wood joints are essential to woodworking, many joint types have been used for centuries and even millennia. Carpenters and craftsmen of ancient China and Egypt helped perfect joinery methods that contractors and woodworkers still use today.
Learn about the anatomy of cabinets, common materials, and the proper techniques to build quality pieces with cabinet maker Ken DeCost in MT Copeland’s Introduction to Cabinetry online course.
12 Common wood joint types
Any project made of wood, from the frame of a house to a small cabinet, will soon run into a challenge—how do you connect or join two pieces of wood to form a larger structure? Here is a look at 12 different types of wood joints and when to use each type to get the best result for your project.
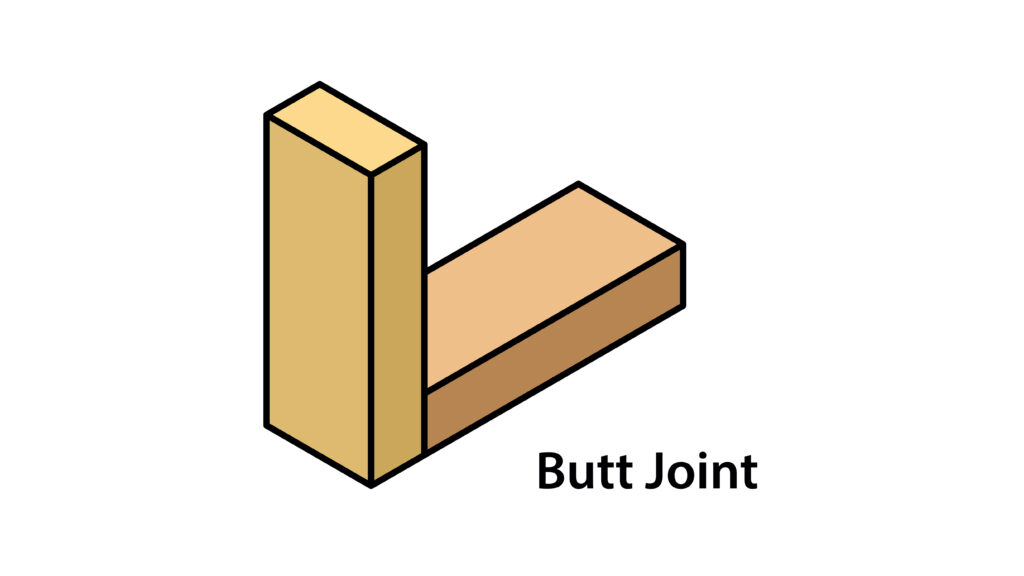
1. Butt joint
A butt joint is the most basic type of wood joint. Two different wood pieces simply sit side by side, with the butt of one workpiece adjacent to the butt of another workpiece. Unlike other wood joints, the two pieces are not shaped or carved to lock into each other, and mechanical fasteners are typically used to hold them together.
In construction projects, butt joints may be found around baseboards and window trims, and they are an easy option when speed of construction matters more than looks.
Tip: While the basic butt joint is a workhorse and not a show pony, countersinking nails or screws can make it more attractive.
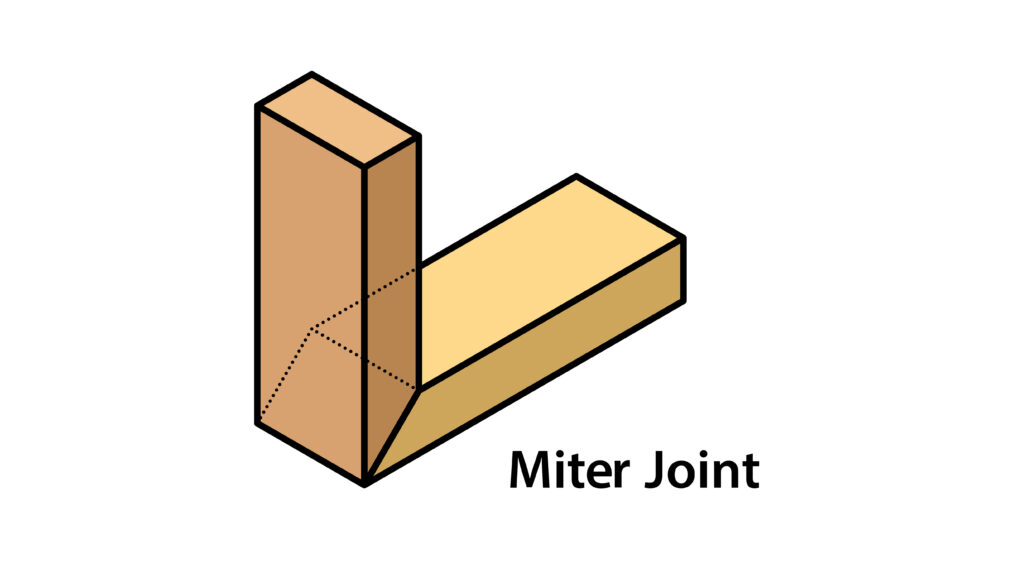
2. Miter joint
“Miter” is another word for an angled cut—and the saw that makes the cut. In the term “miter joint,” it refers to two 45-degree angled cuts where the pieces of wood adjoin to create a 90-degree angle. While the most common miter joints are made of 45-degree angles, miter butt joints can be cut at any range of angles. For example, if you want to build an octagonal-shaped structure, then you would cut each miter to 22.5 degrees.
Miter joints are commonly used at the visible, outside corners of door, window, and picture frames. They are stronger than butt joints because there is a greater surface area where the two wood pieces meet, but they still require both glue and mechanical fasteners to stay in place.
Tip: Be prepared to make small adjustments to the angle of your miter because most cuts for door and window frames are not precisely 45 degrees due to slight variations in drywall or other construction materials.


3. Coped joint
A coped joint is a variation on the miter joint that lays underneath the miter joint. It addresses the reality that the corners of many rooms do not in fact meet at 90-degree angles. Beneath the exterior (visible) miter joint, the two pieces of wood that make up a coped joint are carved like puzzle pieces to form an irregular but custom fit.

4. Tongue-and-groove joint
These joints consist of a tongue, or a ridge, on one piece of wood and a groove, or channel, on the other. The tongue slides into the groove to create a strong joint.
These joints are commonly used for elements that lie flat on a surface, such as hardwood floors. Most contractors don’t have to worry about creating them as flooring materials typically arrive with the joints already cut, and the only challenge is sliding the elements together.
Tip: If you are cutting your own tongue-and-groove joint, the tongue should be one-third of the thickness of the wood. For example, if a board is ¾” thick, the tongue should be ¼”.

5. Mortise joint
Mortise joints are also known as mortise-and-tenon joints. While they look like butt joints from the outside, a protruding element is carved into one piece (the tenon) which slides into a corresponding recess (the mortise) in the other piece. With the increased gluing surface area where the two wood pieces are joined, it is a significantly stronger—and more elegant—alternative to a butt joint.
Tip: Always cut the mortise first. It is easier to trim the tenon to fit the mortise than it is to approach the task the other way around.

6. Half-Lap joint
With a half-lap joint, the ends of the two adjoining pieces of wood are reduced to half their thickness at the point where they overlap. There are stronger joints, but a half-lap has an aesthetic appeal over butt joints because they maintain a uniform thickness with the rest of the structure.
Half-lap joints are commonly used in framing and also in furniture construction, due to their great advantage: the frame remains uniform in thickness while other joints often result in a greater (an inconsistent) thickness as compared to the rest of the structure. Thin pieces of wood can be weakened significantly when they lose half of their thickness, so half-lap joints are best suited to thicker pieces of wood.

7. Dado joint
The dado joint gets its name from the Italian word for a die or plinth. It resembles a groove—a trench cut into one piece of wood parallel to the grain that another piece of wood slides into. But unlike a groove, a dado runs perpendicular to the grain.
Dado joints are most commonly used in shelving systems like cabinets and bookshelves. The dado cut should go no deeper than 1/3 into the wood. If you are using a piece that is ¾” thick, keep the cut to ¼”.

8. Rabbet joint
Another joint with an unusual name (in this case from a Middle French word meaning “to force down”), a rabbet joint is related to the dado joint and consists of an open-sided channel along the end of a piece of wood. It often matches a corresponding cut in the piece it is paired with to create a double rabbet joint.
Woodworking joints come in a variety of configurations that join together two pieces of wood. Some joints involve carving channels into two different wood pieces so that they lock together, while others use fasteners like nails or screws to hold them in place.
Because wood joints are essential to woodworking, many joint types have been used for centuries and even millennia. Carpenters and craftsmen of ancient China and Egypt helped perfect joinery methods that contractors and woodworkers still use today.
Learn about the anatomy of cabinets, common materials, and the proper techniques to build quality pieces with cabinet maker Ken DeCost in MT Copeland’s Introduction to Cabinetry online course.
12 Common wood joint types
Any project made of wood, from the frame of a house to a small cabinet, will soon run into a challenge—how do you connect or join two pieces of wood to form a larger structure? Here is a look at 12 different types of wood joints and when to use each type to get the best result for your project.
1. Butt joint
A butt joint is the most basic type of wood joint. Two different wood pieces simply sit side by side, with the butt of one workpiece adjacent to the butt of another workpiece. Unlike other wood joints, the two pieces are not shaped or carved to lock into each other, and mechanical fasteners are typically used to hold them together.
In construction projects, butt joints may be found around baseboards and window trims, and they are an easy option when speed of construction matters more than looks.
Tip: While the basic butt joint is a workhorse and not a show pony, countersinking nails or screws can make it more attractive.
2. Miter joint
“Miter” is another word for an angled cut—and the saw that makes the cut. In the term “miter joint,” it refers to two 45-degree angled cuts where the pieces of wood adjoin to create a 90-degree angle. While the most common miter joints are made of 45-degree angles, miter butt joints can be cut at any range of angles. For example, if you want to build an octagonal-shaped structure, then you would cut each miter to 22.5 degrees.
Miter joints are commonly used at the visible, outside corners of door, window, and picture frames. They are stronger than butt joints because there is a greater surface area where the two wood pieces meet, but they still require both glue and mechanical fasteners to stay in place.
Tip: Be prepared to make small adjustments to the angle of your miter because most cuts for door and window frames are not precisely 45 degrees due to slight variations in drywall or other construction materials.
3. Coped joint
A coped joint is a variation on the miter joint that lays underneath the miter joint. It addresses the reality that the corners of many rooms do not in fact meet at 90-degree angles. Beneath the exterior (visible) miter joint, the two pieces of wood that make up a coped joint are carved like puzzle pieces to form an irregular but custom fit.
4. Tongue-and-groove joint
These joints consist of a tongue, or a ridge, on one piece of wood and a groove, or channel, on the other. The tongue slides into the groove to create a strong joint.
These joints are commonly used for elements that lie flat on a surface, such as hardwood floors. Most contractors don’t have to worry about creating them as flooring materials typically arrive with the joints already cut, and the only challenge is sliding the elements together.
Tip: If you are cutting your own tongue-and-groove joint, the tongue should be one-third of the thickness of the wood. For example, if a board is ¾” thick, the tongue should be ¼”.
5. Mortise joint
Mortise joints are also known as mortise-and-tenon joints. While they look like butt joints from the outside, a protruding element is carved into one piece (the tenon) which slides into a corresponding recess (the mortise) in the other piece. With the increased gluing surface area where the two wood pieces are joined, it is a significantly stronger—and more elegant—alternative to a butt joint.
Tip: Always cut the mortise first. It is easier to trim the tenon to fit the mortise than it is to approach the task the other way around.
6. Half-Lap joint
With a half-lap joint, the ends of the two adjoining pieces of wood are reduced to half their thickness at the point where they overlap. There are stronger joints, but a half-lap has an aesthetic appeal over butt joints because they maintain a uniform thickness with the rest of the structure.
Half-lap joints are commonly used in framing and also in furniture construction, due to their great advantage: the frame remains uniform in thickness while other joints often result in a greater (an inconsistent) thickness as compared to the rest of the structure. Thin pieces of wood can be weakened significantly when they lose half of their thickness, so half-lap joints are best suited to thicker pieces of wood.
7. Dado joint
The dado joint gets its name from the Italian word for a die or plinth. It resembles a groove—a trench cut into one piece of wood parallel to the grain that another piece of wood slides into. But unlike a groove, a dado runs perpendicular to the grain.
Dado joints are most commonly used in shelving systems like cabinets and bookshelves. The dado cut should go no deeper than 1/3 into the wood. If you are using a piece that is ¾” thick, keep the cut to ¼”.
8. Rabbet joint
Another joint with an unusual name (in this case from a Middle French word meaning “to force down”), a rabbet joint is related to the dado joint and consists of an open-sided channel along the end of a piece of wood. It often matches a corresponding cut in the piece it is paired with to create a double rabbet joint.
Rabbet joints are an aesthetically appealing joint, though not especially strong and are therefore best used in constructing the back of cabinet cases and other jobs where great strength isn’t a requirement. Because of its larger surface area, a double rabbet is the better choice if you need a more rigid joint.

9. Pocket-hole joint
Pocket-hole joints rely on fasteners, namely pocket-hole screws. They are effectively a butt joint with a small pocket-hole drilled into one of the pieces of wood. The two pieces are then attached with a self-tapping pocket-hole screw.
Pocket-hole joints are strong and easy to make. Their downside is that they are less visually appealing than other joints making them better for temporary uses, or places where the joint will not be visible.
Tip: The screws will hold better in face or edge grain, so avoid screwing into end grain.

10. Dowel joint
Because dowel joints are more difficult to create than pocket hole joints, they are less popular now than they once were. To make a dowel joint, drill holes where the two pieces meet, place a small amount of glue in them, insert the dowels, and then clamp the pieces together.
Dowel joints serve the same purpose as pocket-hole joints but are more aesthetically appealing, and wooden dowels offer greater strength than nails or screws.
Tip: Expandable fluted dowels grow by about 1/32” when they come in contact with moisture in glue which can help ensure a tightly fitted joint.

11. Biscuit Joint
This unusual joint is formed by carving two curved grooves into two pieces of wood, and then joining them with a wood biscuit that is glued into place.
Biscuit joints are typically used with sheet goods like plywood and particle board but can also be used with solid panels of different types of wood. The advantage of this joint is that it is entirely invisible creating a perfectly flush surface.
Tip: You should cut the slots into the same side of each piece of wood that you’re joining—if you are going to use the end grain for one side of the joint, the other side should be end grain too, for example—to assure that they are perfectly flush.
Tip: It’s important that the glue inside the biscuit joint is evenly distributed for the best fit. Use an acid brush (also called a glue brush) to assure a uniform coating.

12. Dovetail Joint
A dovetail joint is of the most distinctive joints and is recognized as a sign of expert craftsmanship. They are made of a series of interlocking pins and tails in trapezoidal shapes. They were long covered by veneers, but today they are typically left visible in appreciation of the skill involved in creating them.
Their dominant characteristic is their resistance to being pulled apart so they are most commonly used in constructing drawers. A box joint, which lacks the trapezoidal shape, is a dovetail variation that is easier to construct.
Tip: Key to successfully creating dovetail joints is accurately marking your baselines before starting. A dull gauge will tear the fibers of the wood, so make sure yours is sharp.
MT Copeland offers video-based online classes that give you a foundation in construction fundamentals with real-world applications, like building cabinets.
Classes include professionally produced videos taught by practicing craftspeople, and supplementary downloads like quizzes, blueprints, and other materials to help you master the skills.

Featured Instructor
Ken Decost
Ken DeCost is a cabinet maker based in Boston, MA. Growing up in a family of tradesmen, Ken began to develop his carpentry skills from a young age. Over the last ten years he has honed his expertise in high end cabinet making. In 2017, he became the Director of Millwork for custom home builder, NS Builders. Here he has assembled a skilled team that aligns to his level of high standards and excellence. From traditional to ultra modern, complex curved work to hand stitched veneering, he continues to push the limits of perfection and craftsmanship.
Explore Classes


